By adding your products to your Buy with Prime catalog, you can manage and select the products you want to offer Buy with Prime on your ecommerce site.
You can add products for Buy with Prime using one of the following options:
- Option 1 Import from Amazon: Go to Import from Amazon.
- Option 2 Add your products manually: See detailed information in Manage your Buy with Prime catalog.
- Option 3 CSV import: Go to Catalog CSV import and export.
To learn more about Import from Amazon, go to Import from Amazon.
To learn more about CSV import and export, go to Catalog CSV import and export.
To learn more about Buy with Prime, go to Set up Buy with Prime.
To learn more about activating Amazon’s fulfillment services, go to Order fulfillment.
Verify your inventory
To add products to your catalog, ensure you have inventory available.
- If you’re a current seller on Amazon, but don’t sell a specific product there, perform the steps listed in Add products not sold on Amazon.
- If you’re a current seller on Amazon and have inventory available, continue to Add products to your Buy with Prime catalog.
- If you aren’t a current seller on Amazon, create an Amazon seller account or a Supply Chain Portal account, and then perform the steps listed in Add products not sold on Amazon.
- If you’re an Amazon vendor, contact your sales representative.
Add products not sold on Amazon
There are two options to add your products not sold on Amazon to the Amazon catalog:
If you’re an Amazon seller and prefer to manage a consolidated pool of inventory for orders placed on Amazon.com and through Buy with Prime, perform the following steps to add your product using Seller Central:
- Sign in to your Seller Central account.
- In the Manage Your Inventory section, choose Add a Product, and then choose Search or Create New Product.
- Search lets you to search for your item to see if it already exists in the Amazon.com catalog. This would be the best option if you have a Universal Product Code (UPC) for the product that you need to add to your inventory.
- If the UPC is linked to an ASIN in the catalog, the system shows you the picture of the ASIN that you entered and you see the sell yours option.
- If no product appears, create a new product.
- Create New Product lets you to create a new ASIN for an item that can’t be found in the catalog. Follow the on-screen prompts to enter your product details.
- Search lets you to search for your item to see if it already exists in the Amazon.com catalog. This would be the best option if you have a Universal Product Code (UPC) for the product that you need to add to your inventory.
- Publish your product to Amazon.
- Choose More info, and then set the Offering Release Date to a date in the year 2050, which ensures that it won’t go up for sale on Amazon.com.
- Verify that the product status appears as Inactive (Start Date in future) in Seller Central. Note that it can take up to 15 minutes to appear.
- Follow the instructions to ship inventory into Amazon Fulfillment Centers.
- Import this product into your Buy with Prime catalog and turn Offer Prime on by following the steps listed in Add products to your Buy with Prime catalog.
If you don’t sell on Amazon.com, or are an Amazon seller that would like a streamlined listing experience and fewer product restrictions, you can use Supply Chain Portal (SCP).
Supply Chain Portal gives you access to real-time inventory visibility and management, order management, detailed reporting, and tracking for all your Amazon Multi-Channel Fulfillment (MCF) shipments and orders. There are also fewer restrictions for creating listings with SCP than Seller Central, which can potentially save you time and allow you to use MCF and Buy with Prime for a wider selection of your products.
- SCP listings are proprietary to the seller that created them; you can use MCF to fulfill products without matching them to existing Amazon store listings.
- SCP listings don’t have brand restrictions; you can use MCF to fulfill products without authorization from brand owners.
- SCP listings don’t require a product identification code; you can use MCF to fulfill products that don’t have a registered Global Trade Item Number (GTIN) or Universal Product Code (UPC.)
Perform the following steps to add your product using SCP:
- Sign in to your SCP account.
- On the side menu, choose Inventory, and then Add product.
- Select Add a product by category.
- Search or Browse for the product type that you would like to list.
- Enter the product identity details (Name, Brand, Product ID, Manufacturer, Etc.).
- Select n/a for Product ID if you do not have a registered GTIN or UPC.
- Enter the selling details (SKU and Item Value.)
- Enter the product description (Description, Bullet Point, Color, Etc.)
- Enter product safety & compliance details (Battery, Hazmat, Country/Region of Origin).
- Upload product image.
- Enter shipping details (Package Length, Package Width, Package Height, Package Weight, Etc.)
- Click Submit to create the listing.
- Import this product into your Buy with Prime catalog and turn Offer Prime on by following the steps listed in Add products to your Buy with Prime catalog.
After it’s processed, you can find listing details and status on the side menu, by choosing Inventory, and then All Inventory.
Note: If you require additional assistance, navigate to the Support tab in the main menu, and select Contact Us.
Note: Supply Chain Portal listings or inventory don’t appear in Seller Central and can’t be used to fulfill orders in the Amazon store. Some Buy with Prime features, such as Reviews from Amazon are also not be supported by SCP listings.
Send inventory to Amazon
If you created listings in Seller Central, the steps and requirements for sending inventory to Amazon for MCF are the same as FBA. For more information on how to create a shipment plan for inbounding your inventory to Amazon’s fulfillment centers, go to Send to Amazon.
If you created listings in Supply Chain Portal, when you’re ready to send inventory to Amazon, start the Send to Amazon process in SCP by following these steps:
- Sign in to your SCP account.
- On the main menu, select the Shipments tab.
- Click New Shipment, and then select Supply Chain Portal listing.
- Complete the Send to Amazon workflow for your shipment. For instructions, go to Create shipment with Send to Amazon.
Note: All SCP items are must be labeled with an Amazon barcode so that they can be tracked throughout the fulfillment process. - You can view in progress, in transit, or completed Send to Amazon workflows by returning to the Shipments tab.
Note: Combined inbound shipments for Seller Central listings and Supply Chain Portal listings isn’t supported.
Add products to your Buy with Prime catalog
To add products to your catalog, perform the following steps:
- Sign in to merchant console.
- On the side menu, choose Products, and then from the Add product drop-down menu, select Manually.
- On the Product details page, enter the Product title.
Note: The title can’t exceed 250 characters. - (Optional) Enter the product description. Note: The Description can’t exceed 6,000 characters.
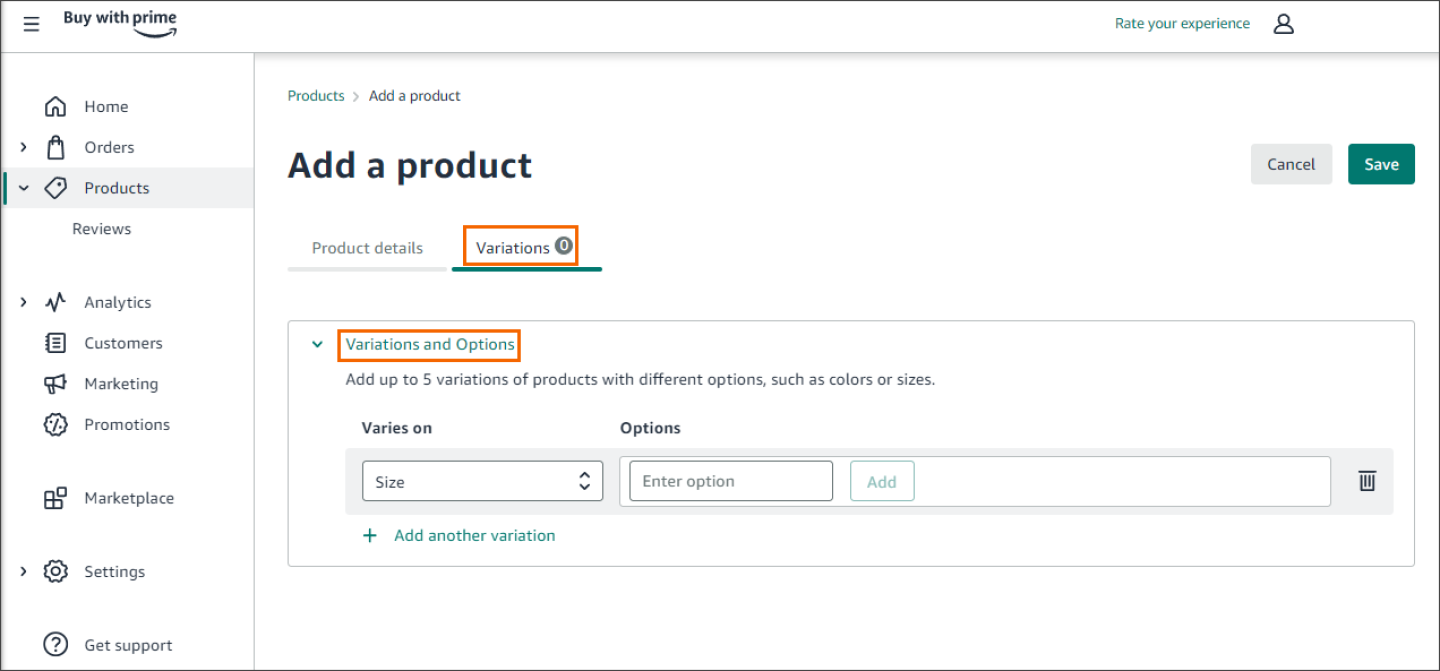
- If your product has variations, choose the Variations tab and continue to Step 6. If your product doesn’t have variations, skip to Step 12.
- Choose Variations and Options.
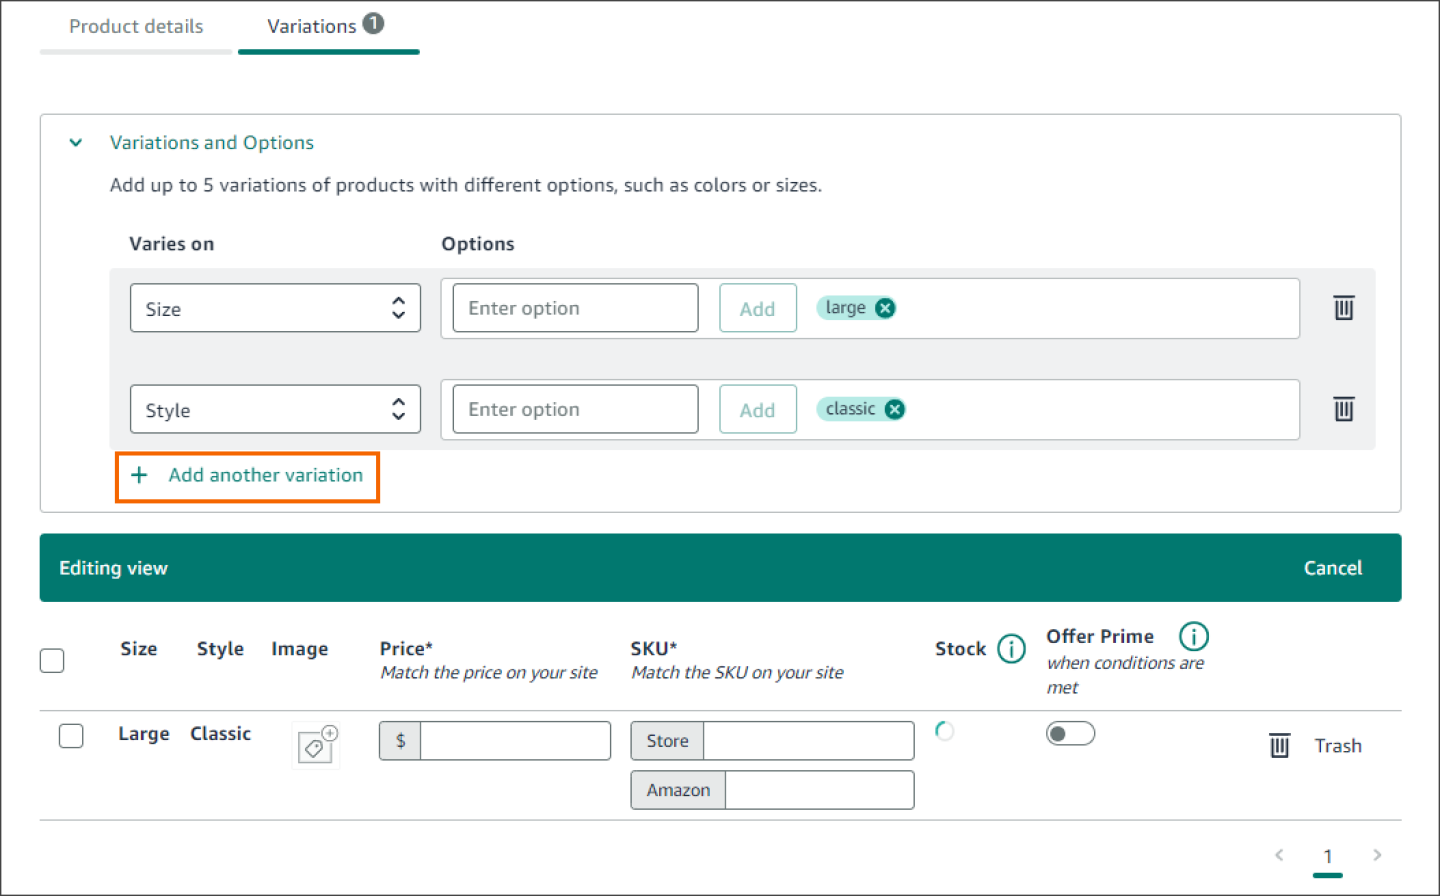
- From the Varies on drop-down menu, select the variation type. You can choose size, color, or style.
- In the Options field, enter the option(s) for the variation type. For example, large, green, or classic.
- Choose Add.
- If your product has more variations, choose Add another variation, and repeat steps 7-9 for each variation that you add.
Note: You can add up to five variation types and 100 variation options for each product. Ensure that the multiple variants have different attributes when listed under a parent product. - Enter the product Price and ensure that the product price matches the price on your site. For Buy with Prime checkout, Amazon uses the price in your Buy with Prime catalog.
- In the Product images section, choose Upload file, and then choose the featured image for this product. Shoppers will see the featured image in the Buy with Prime checkout and in post purchase environments such as the order confirmation email and the order tracking page.
- Enter the SKU for the product, which should match the product SKU on your site.
- Enter the Amazon SKU for the product, which should match your Amazon SKU on Seller Central for the product that will be shipped for a Buy with Prime order.
- Turn Offer Prime on when all conditions are met.
Note: The Buy with Prime button doesn’t support merchant fulfilled products. - (Optional) In the Product detail page URL section, enter the URL to the product detail page on your ecommerce site. Note: The URL can’t exceed 2,000 characters.
- For products with variations, select whether you want to enter the URL for a Parent product or a Variation. Parent refers to the main product, and Variation refers to the different variants of the product, such as different colors, sizes, or styles.
- Choose Save.
Tip: If you’ve completed the steps to set up Buy with Prime and have pasted the Buy with Prime button code into the product detail page template of your site, go to your site’s product detail page for this product to confirm that the Buy with Prime button is rendering correctly.
Edit your Buy with Prime catalog
You can edit one or multiple products:
To edit a product:
- Sign in to the merchant console.
- On the side menu, choose Products.
- Choose the product that you want to edit to open the Edit Product page.
- Edit your product details, and then choose Save.
To bulk edit products:
- Sign in to the merchant console.
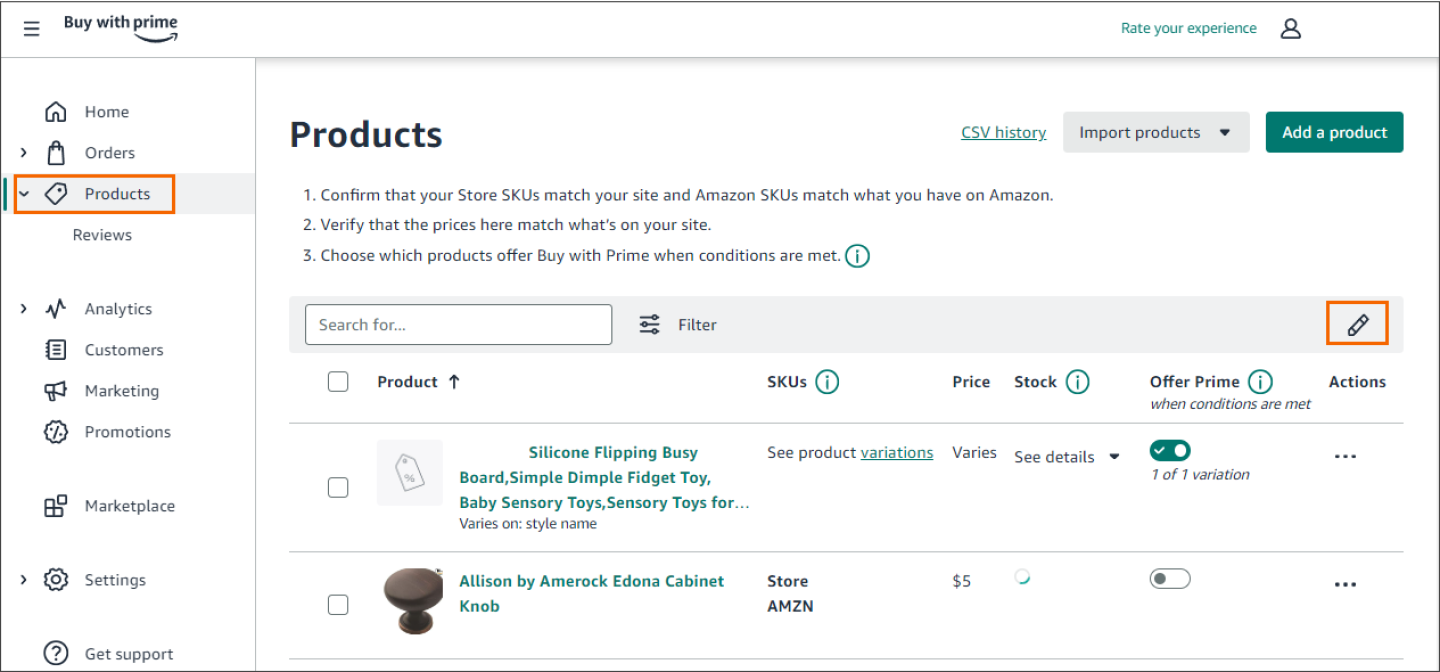
- From the side menu, choose Products.
- Choose the edit icon to open the Editing view.
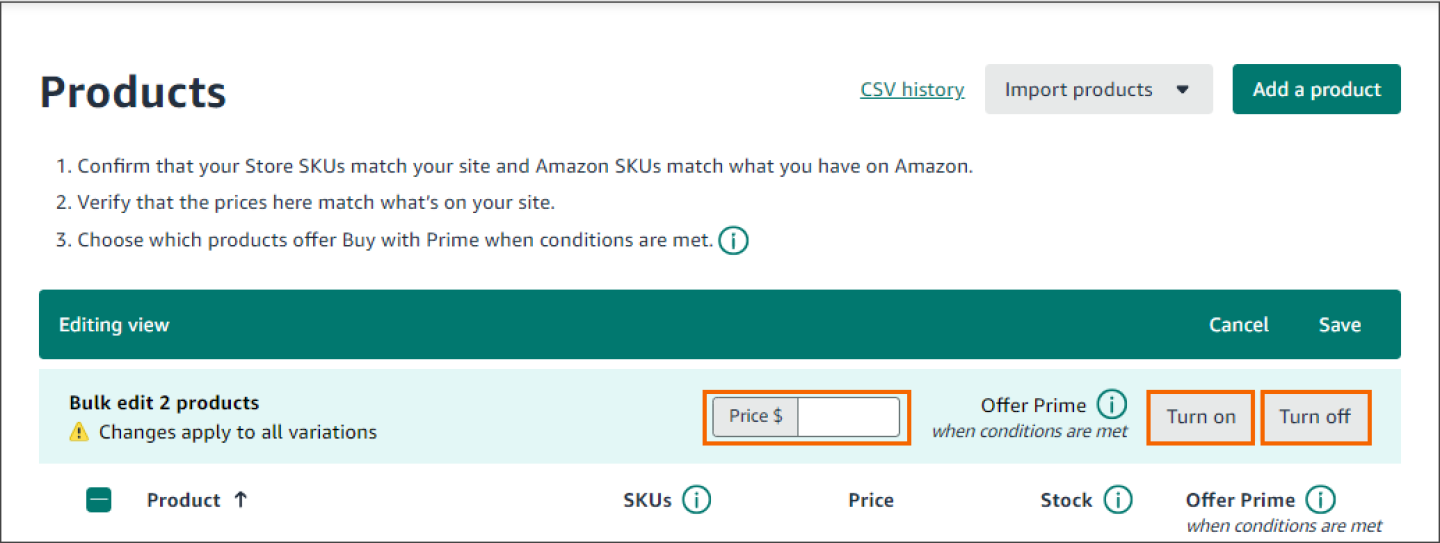
- Select the products that you want to bulk edit, and use the Editing view menu to make your updates.
Note: Only the Price and Offer Prime attributes can be bulk edited. Choose Save.
You can also make bulk updates by exporting your Buy with Prime catalog as a CSV, making updates in a spreadsheet software, and then importing the updated CSV. To learn more, go to Catalog CSV import and export.
Update details for product catalog imported from Amazon
To update details for the product catalog that you imported from Amazon, perform the following steps:
- Sign in to merchant console.
- On the side menu, choose Products, and then select the product that you want to update.
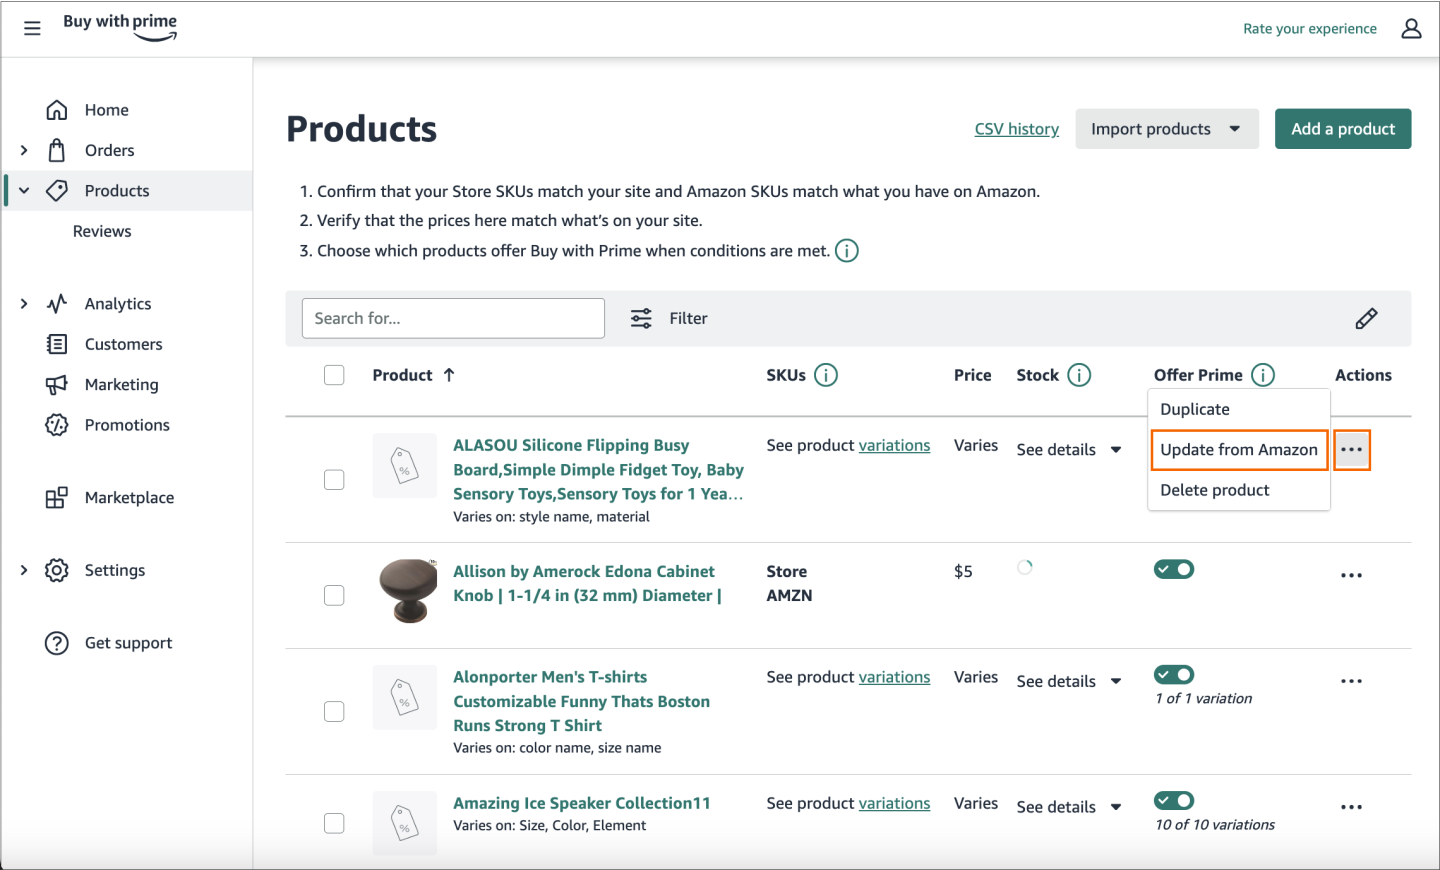
- On the Actions column, choose the more actions (...) menu. Alternatively, you can choose the product title to be redirected to the product details page, and then choose Actions.
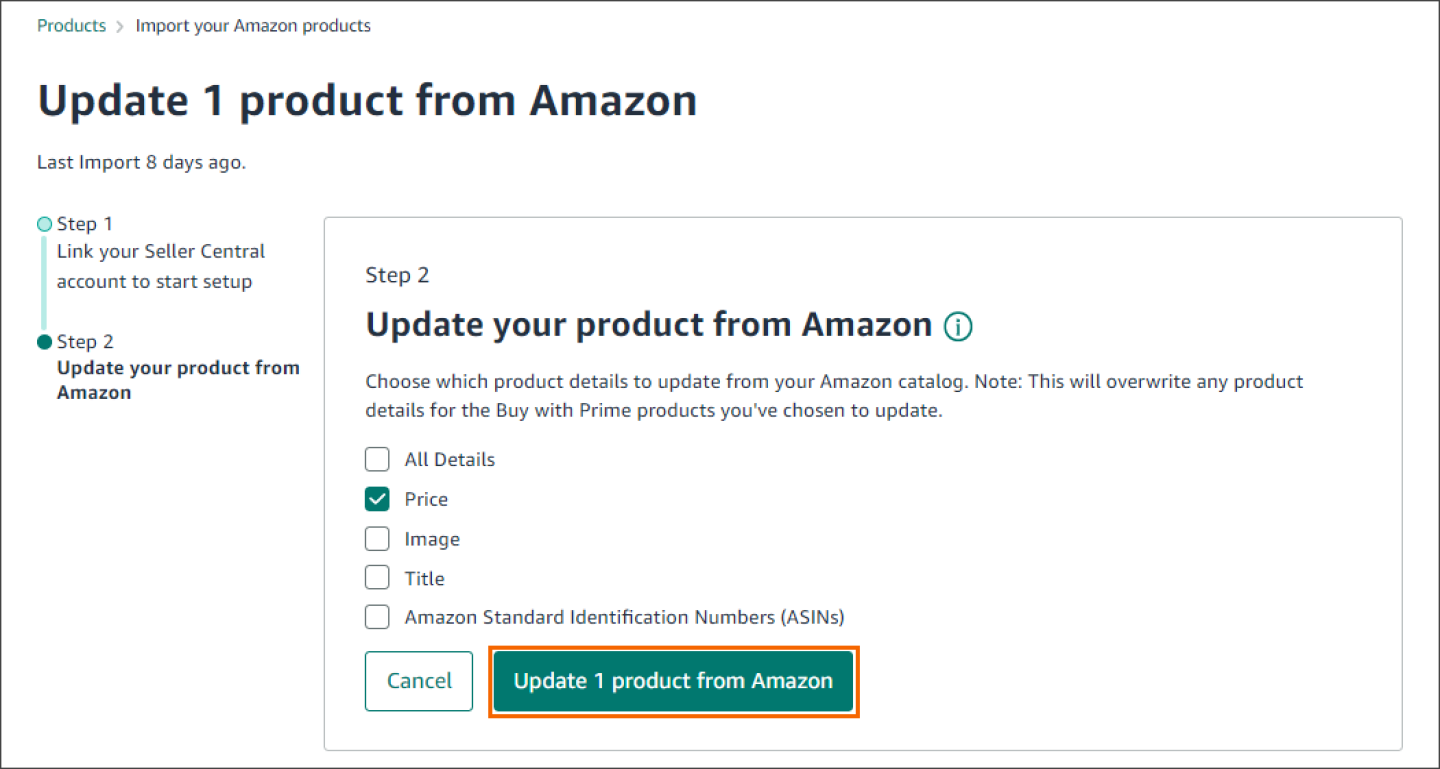
Choose Update from Amazon to be directed to a new page where you can select which product details to update from your Amazon catalog.
You can select to update the following product details:
- All details
- Price
- Image
- Title
- Amazon Standard Identification Numbers (ASINs)
Choose Update product from Amazon.
Note: This action will overwrite any product details for the Buy with Prime products you’ve chosen to update.
Delete products from your Buy with Prime catalog
To delete products from your catalog, perform the following steps:
- Sign in to merchant console.
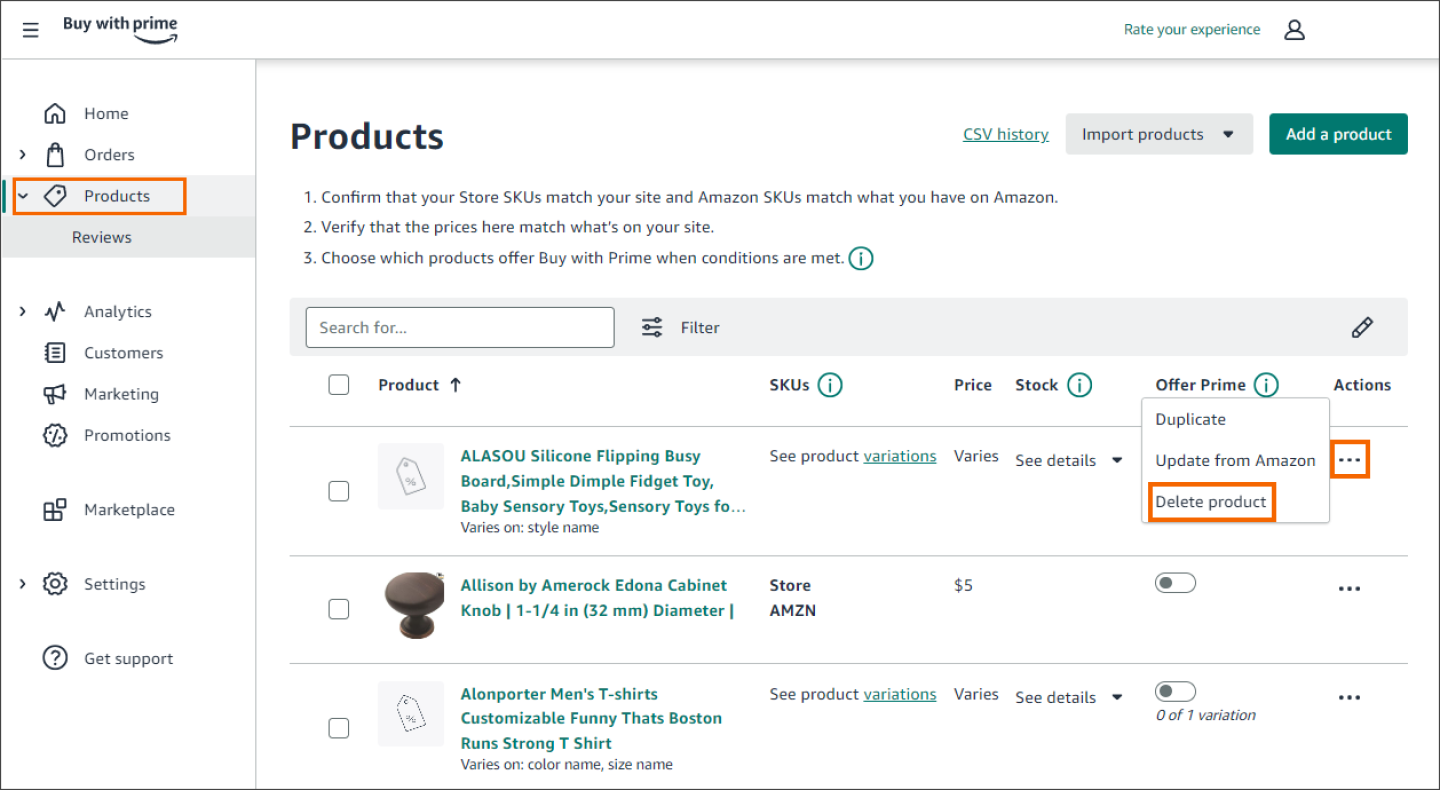
- On the side menu, choose Products.
- Choose if you want to delete one or more products:
To delete one product: From the Actions column, choose […] next to the product that you want to delete, and then choose Delete product. Alternatively, choose the product that you want to delete, on the Edit product page choose the the more actions (...) menu, and then Delete product.
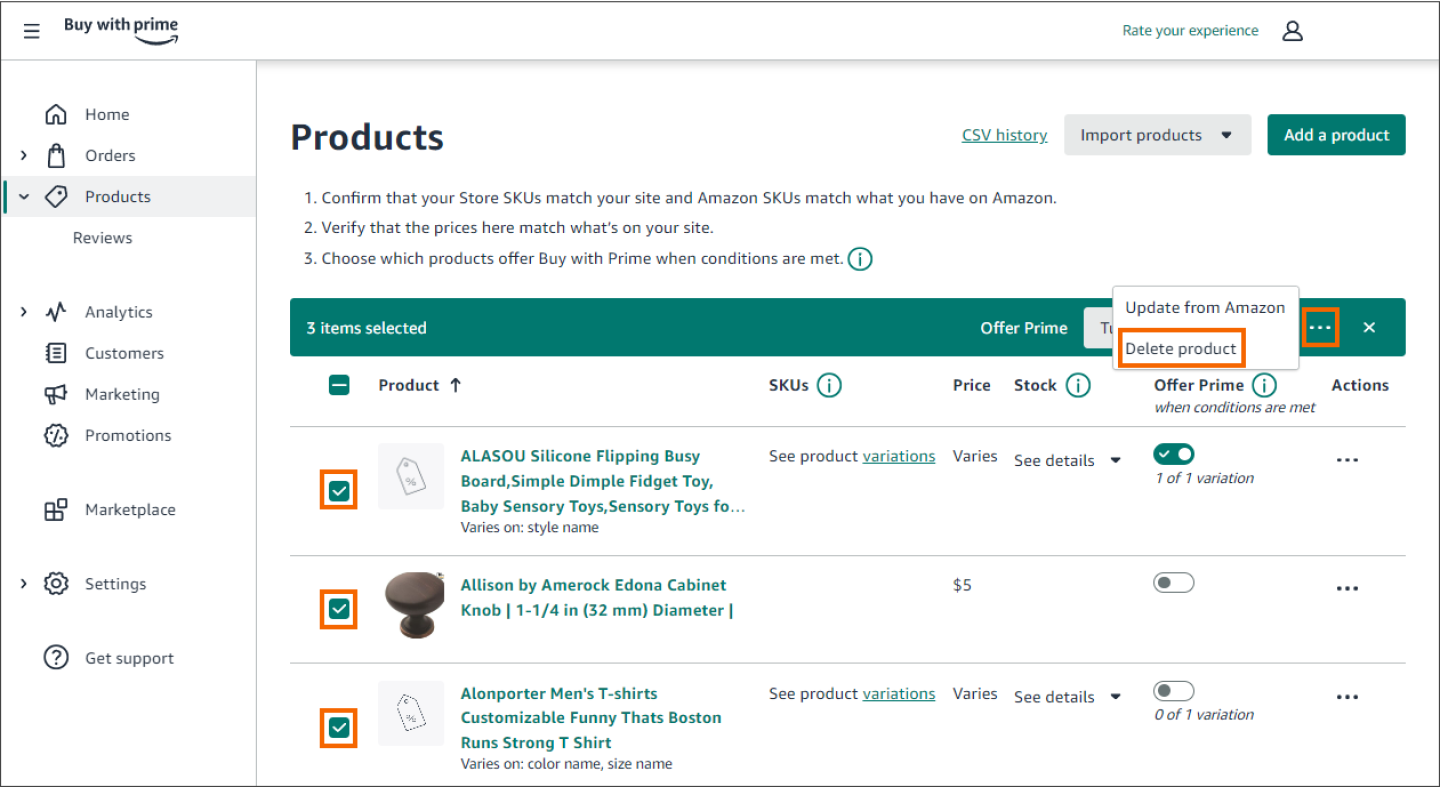
- To delete multiple products: Select all the products that you want to delete, then from the Actions column, choose the more actions (...) menu, and then Delete products.
- Choose Delete product.
- After your changes are saved, review your catalog to confirm that the product you deleted is no longer listed.
Import from Amazon
To import your Amazon product catalog information from Seller Central directly into your Buy with Prime catalog:
- Sign in to merchant console.
- On the side menu, choose Products.
- Choose Add products, and then select Import from Amazon.
- Follow the prompts to link your Seller Central account and connect it to Buy with Prime.
- You can select to import new products or update existing product details.
Choose Import your Amazon products.
Note: Import from Amazon will only import product catalog information for Amazon-fulfilled products from Seller Central, and product catalog information for your merchant fulfilled products won’t be imported. To learn more about Import from Amazon, go to Import from Amazon.
Buy with Prime catalog FAQ
Get answers to common questions about the Buy with Prime catalog.
For other questions, go to FAQ library.


