Types of refunds
Fully automated refunds
Your customers’ returns for eligible products is automated from the time they submit the return request until they get their refund. Customers can request free returns from the online returns center, which they access using a link in their order confirmation email. From the online returns center, customers can print out shipping labels for carrier drop off and return merchandise authorizations (RMAs) along with instructions. If the return is eligible for an instant refund, the refund is processed as soon as the customer drops off the product with the carrier. Otherwise, the return is processed after the product arrives at the fulfillment center, and the refund is either approved or denied, as appropriate.
Manual refunds
You can manage refunds manually from the Orders tab in the merchant console. To learn more about managing refunds, go to: Manage and issue refunds.
A-to-z Guarantee claims
The Amazon Pay A-to-z Gurantee provides customers with an opportunity to obtain a full reimbursement for their purchase or cancel their authorized payment if they aren’t satisfied with a purchase made on a third-party site using Amazon Pay. By using Amazon Pay services through Buy with Prime you have access to the Amazon Pay A-to-z Gurantee program.
Important: For every claim submitted by a customer through the A-to-z Guarantee claims process, Amazon Pay sends you an email with details of the claim and requests your response, giving you an opportunity to present your side of the issue. You can respond to the claim by replying to the email claim notification (Subject: Amazon Pay A-to-z Guarantee claim filed for Amazon Pay Order ID <>, From: amazon-pay-seller-guarantee@amazon.com) with the requested information. If you have a Seller Central account you can also manage your claims proactively by visiting the A-to-z Guarantee claims page in Seller Central (find a link to the A-to-z Guarantee claims page in the Performance section).
Important: You have seven calendar days to respond to Amazon Pay’s notification, but it is a best practice to reply immediately. Within the seven calendar day period, you can issue a refund to the customer or represent your case to Amazon. If the item that is the subject of the claim has not yet shipped, you can cancel that portion of the order. If you do not respond within the time frame, Amazon Pay will automatically assign the claim to you. For assigned claims, Amazon Pay will reimburse the customer and may debit your account or cancel any future payment, as applicable.
Important: Amazon Pay might follow up with you to request more details as the investigation of the claim progresses. Please keep track of all emails from Amazon Pay and respond as soon as possible (i.e. within three calendar days for any follow-up replies).
Buy with Prime chargeback
Important: In the case of a chargeback, Amazon Pay will send an email notification to your Amazon Pay account email address. To access your Amazon Pay emails, go to the Performance section of Seller Central account.
What is a chargeback?
In the case of a buyer dispute or an A-to-z Guarantee claim, the buyer contacts Amazon Pay to mediate a problem with their transaction or to make a claim under our A-to-z Guarantee program. In the case of a chargeback, the buyer contacts their bank or credit card company to dispute a charge. Note that the bank or credit card company decides the outcome of a chargeback, not Amazon Pay.Important: First, review your chargeback notification for important details such as the reply-by date. Next, review transaction details along with any customer communications you have received. Determine whether you would like to dispute or accept the chargeback. If you want to dispute a chargeback, please respond using the instructions found in your chargeback notification email within 11 calendar days.
You can respond to a chargeback by replying to the email chargeback notification (Subject: Amazon Pay <> chargeback received, From: amazon-payments-cb-inquiry@amazon.com) with the requested information.
Important: Amazon Pay might follow up with you on more details as the investigation progresses. Please keep track of all emails from Amazon Pay and it is recommended to respond within three calendar days for any follow-up replies.
Manage and issue refunds
To issue a refund manually:
- Open the merchant console.
- On the side menu, choose Orders, and then Returns.
- Find the order you want to refund, then choose the Actions icon.
- Choose Refund.
- To complete the refund, choose:
- The items in the order that you want to refund.
- Whether you want to send an email notification to the customer. Note: If you choose to add a free-form message to the customer, only include information about the refund and do not include promotional information.
- Whether you’ve already issued a refund through the Amazon Pay console. Note: When you choose this option, the payment status of the item is already Refunded.
When the refund is complete, the status of the item updates to Refunded.
Important: After you issue a refund, you can’t cancel a refund.
Tip: For your products that offer Buy with Prime, you must follow the Buy with Prime pre-defined returns policy and you should update your existing returns policy to incorporate the Buy with Prime returns policy. To learn more about the Buy with Prime return policy, go to About Our Returns Policies.
Dispute a Buy with Prime chargeback
Requirements
If you want to dispute the chargeback, explain your side of the issue in the representation form in Seller Central or by responding to the email from Amazon Pay. At a minimum, you must include the following information:
- The status of the transaction
- A description of the product or service
- Proof that the item or service was received by the cardholder
In addition, it is very helpful to include any of the following:
- Order confirmation emails
- Details of any changes to refunds or canceled orders
- Tracking numbers
- Photos of the item
- A copy of your refund and return policies
- Customer communication records
Note: Describe your side of the issue in detail. This will help the investigator understand the issue.
To dispute a chargeback:
- Upload proof of delivery.
- Open the merchant console.
- On the side menu, choose Orders.
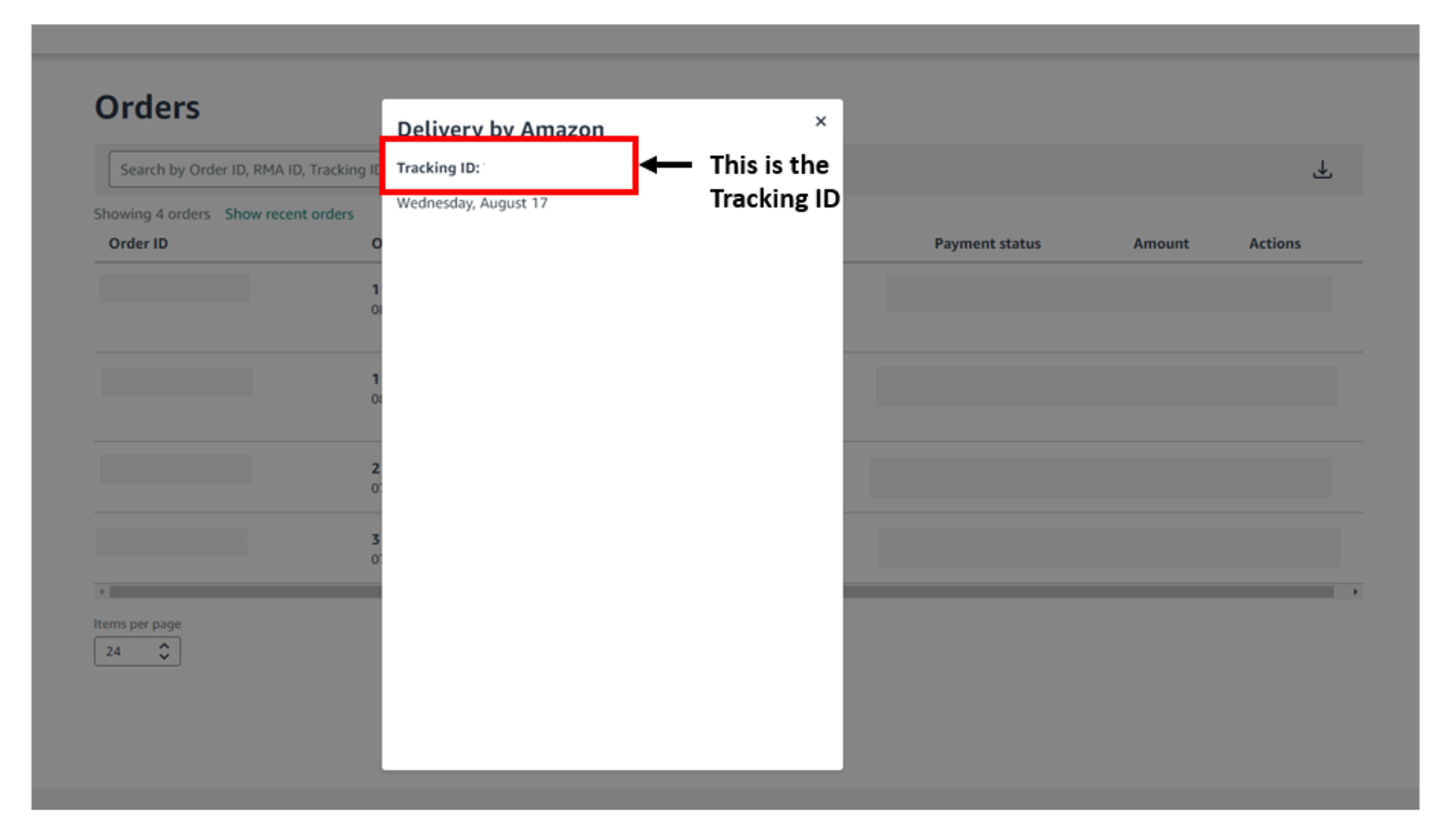
- Search the corresponding Order ID. and choose View shipment details.
- Copy and paste the Tracking ID into your response.
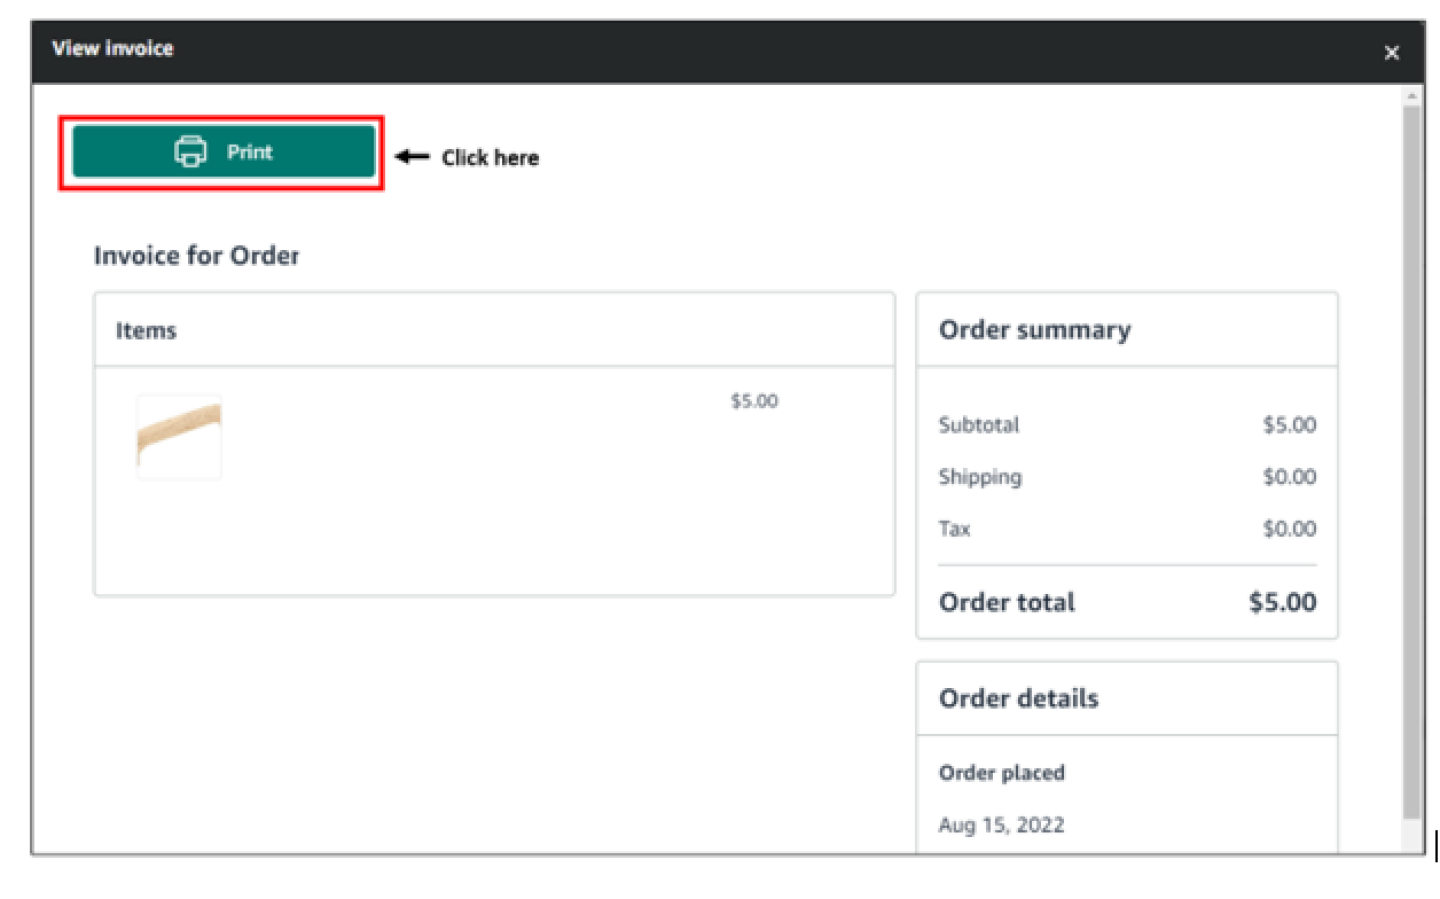
- Upload the invoice. To retrieve this information:
- Open the merchant console.
- On the side menu, choose Orders.
- Search the corresponding Order ID, choose the more actions menu (...), and then View invoice.
- Click Print and then Save to save the invoice as a file. Upload the file as a part of your response.
- On the Item description page, describe the disputed item and add URL of the detail page where the item is listed on your site.
- For the Returns policy, copy and paste the Amazon standard return policy from the About Our Returns Policies page.
- Describe any communication (with screenshots, if possible) you have had with the customer on this particular issue.
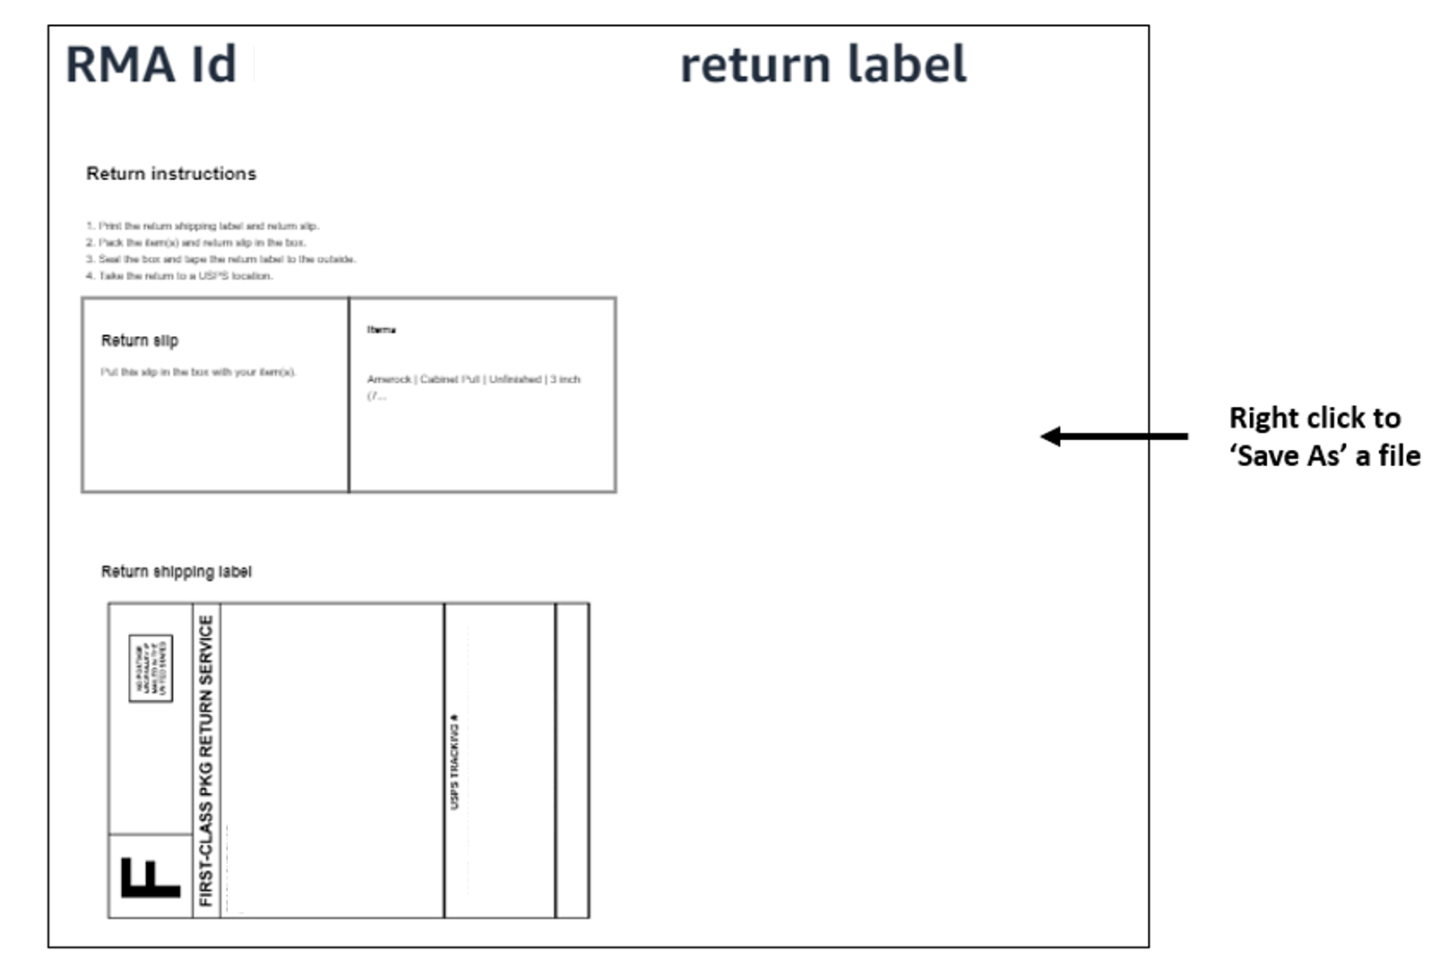
- (Optional) Upload the return label. To retrieve this information:
- Open the merchant console.
- On the side menu, choose Orders, and then Returns.
- Search the corresponding Order ID, choose the more actions menu (...), and then View returns instructions and label.
- Save the return label as a file or take a screenshot and upload as part of the response.
Refunds FAQ
Get answers to common questions about Buy with Prime refunds.
For other questions, go to FAQ library.


![When you click the Actions icon […] on the Order tab, you can view order details, contact customer, view invoice, or process a refund.](https://static.amazon-buywithprime-assets.com/dims4/default/8b0ea82/2147483647/strip/true/crop/2389x483+0+0/resize/1440x291!/quality/90/?url=https%3A%2F%2Fbuy-production-buy.s3.us-east-1.amazonaws.com%2Fbrightspot%2Fbf%2Fb1%2F0faf2b0945129aa536f5b402257e%2Fbwp-refund-actions-40.png)
![The Returns tab shows the RMA ID, return started, items, item status, payment status, return reason, refund date and the [...] Actions icon. Actions allow you to view return details, view order details, and view return instructions and label.](https://static.amazon-buywithprime-assets.com/dims4/default/bc39a0f/2147483647/strip/true/crop/2397x669+0+0/resize/1440x402!/quality/90/?url=https%3A%2F%2Fbuy-production-buy.s3.us-east-1.amazonaws.com%2Fbrightspot%2F20%2F60%2F826badaf4bb0b3bdc1a06ce299b5%2Fbwp-refunds-returns-action-80.png)

