You can use conversion tracking to track when your shoppers place a Buy with Prime order. With conversion tracking, you can share data about interactions on a website (such as orders placed) with ad channels to activate the ad channel to attribute that interaction to an ad campaign and get reporting on your performance.
By using Meta Conversion API, Meta Pixel, Google Ads pixel, and Google Analytics for Buy with Prime, you can choose to send your Buy with Prime order information to Meta and Google.
Meta conversion tracking
With the Social Ads for Buy with Prime app, you can set up Meta Conversion API and Meta Pixel to share your Buy with Prime orders with Meta. Only order events are sent at this time - “Add to Cart” events aren’t supported. This is the most comprehensive approach to sharing data with Meta.
To set up your Meta Conversion API and Meta Pixel:
- Install the Social Ads for Buy with Prime app.
- Link your Meta account to the Social Ads for Buy with Prime app, and then choose the Pixel ID you use to track conversions on your site.
- Turn on Advanced Matching to send more customer data to Meta, which can help Meta improve ad attribution.
- Choose Done.
To add your Meta Pixel (only):
- Within your Meta Business Manager account, under Data Sources, copy the Meta Pixel ID for the pixel you want to use.
- Open the merchant console for Buy with Prime.
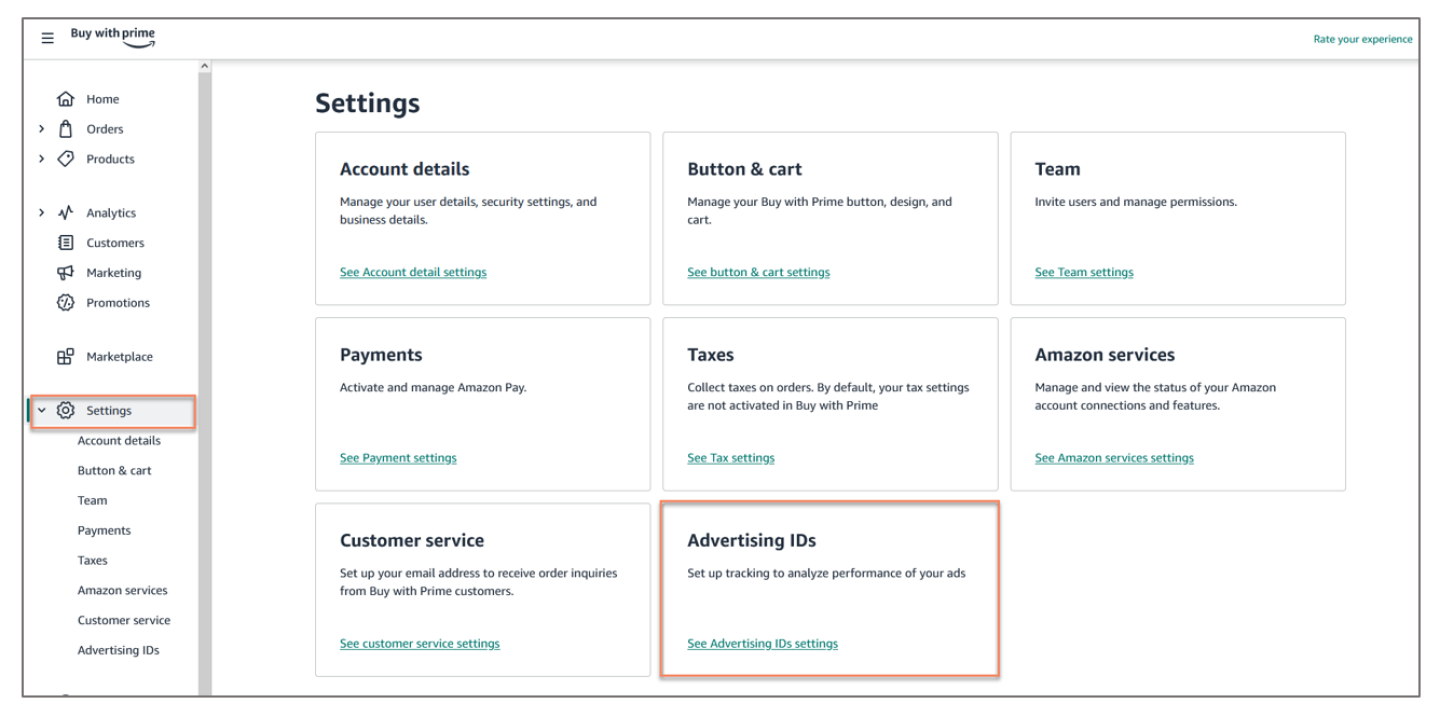
- From the side menu, choose Settings, and then Advertising IDs.
- Paste your Meta Pixel ID in the text field of the Meta Ads section of the Advertising IDs page.
- Turn on Advanced Matching to send more customer data to Meta, which can help Meta improve ad attribution.
- Choose Save.
Google Ads conversion tracking
Google Ads pixel has two components— the Google Ads conversion ID and Google Ads purchase conversion label. The Social Ads for Buy with Prime app allows you set up Google Enhanced Conversion API and Google pixel to share your Buy with Prime orders with Google server-to-server, including customer data that can help Google improve ad attribution. This is the most comprehensive approach to sharing data with Google.
To set up Google Enhanced Conversion API and Google pixel:
- Install the Social Ads for Buy with Prime app.
- Link your Google Ads account to the Social Ads for Buy with Prime app, and choose the Purchase Conversion ID and Purchase Conversion Label you want to use to track Buy with Prime conversions.
- Choose Done.
To add your Google pixel (only):
- From your Google Ads console, copy your Google pixel for the data source that you want to use.
- Choose Tag setup to open the collapsible section, and then choose Install the tag yourself.
- Scroll to the Event snippet sub-section, ensure Page load is selected. Note: You’ll find the pixel ID in the third line of code.
- Then copy the two-part pixel ID (the conversion ID and the conversion label are separated by a “/”). Be sure to choose the conversion label for the Purchase conversion event.
- Open the merchant console for Buy with Prime.
- From the side menu, choose Settings, and then Advertising IDs.
- Paste your Google Ads conversion ID (first part of the pixel ID) in the conversion ID text field and the Google Ads purchase conversion label (second part of the pixel ID) in the purchase conversion label text field.
- Choose Save.
Google Analytics
Google Analytics is a web analytics service offered by Google that tracks and reports website traffic. You can use Google Analytics to gain valuable insights across channels by integrating your Buy with Prime orders. These insights help you understand the performance of your marketing investments and make more informed advertising decisions. Once successfully integrated, you’ll have access to Buy with Prime order information in your Google Analytics account.
Set up Google Analytics
Locate your Google Analytics 4 Measurement ID
- Open your Google Analytics 4 (GA4) account.
- On the bottom left side, navigate to the Admin icon.
- In the Data collection and modification settings, choose Data Streams.
- Choose your active GA4 Data Stream.
- Copy your Measurement ID.
Input your Measurement ID to Buy with Prime
- Open the merchant console for Buy with Prime.
- From the side menu, choose Settings, and then Advertising IDs.
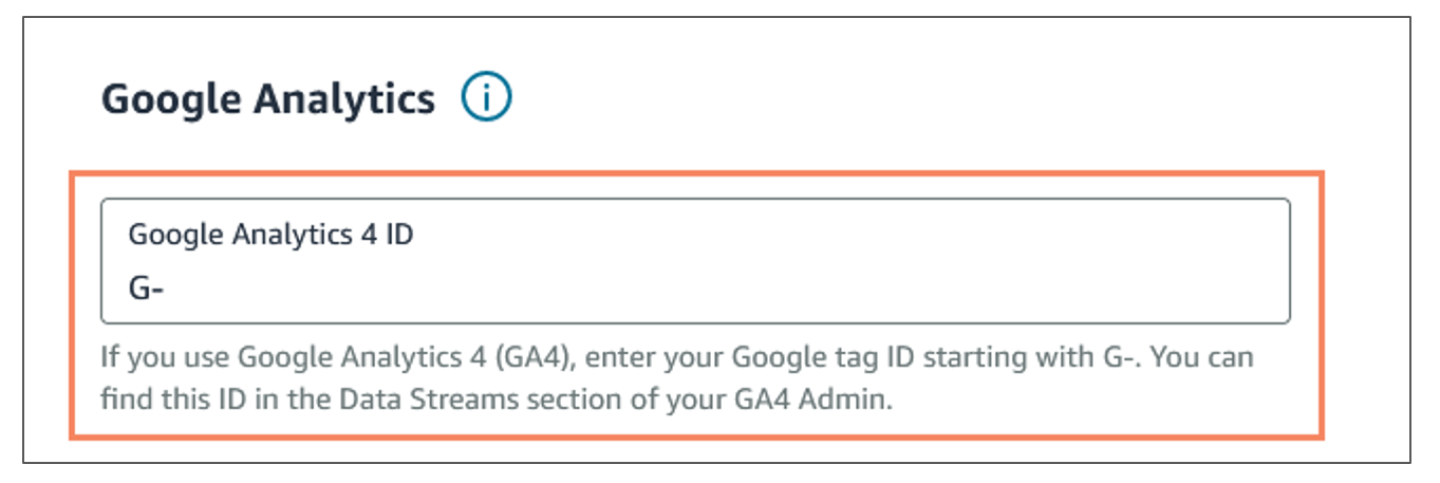
- Enter your Google Analytics Measurement ID. Note: If you use Google Analytics 4 (GA4), enter your Google tag ID starting with G-. You can find this ID in the Data Streams section of your GA4 Admin.
List unwanted referrals
List unwanted referrals settings in GA4 to ensure accurate referral and UTM parameter reporting.
- Open your GA4 account.
- On the bottom left side, navigate to the Admin icon.
- Choose Data Streams.
- Choose Configure tag settings.
- Under Settings, choose Show more.
- Choose List unwanted referrals.
- With match type referral domain contains, paste order.buywithprime.amazon.com in the box.
- Choose Save.
View Buy with Prime order data
Once successfully integrated and after at least one Buy with Prime order has been processed, Buy with Prime order data will begin populating into your Google Analytics account under the Item category, Page title, and Page path dimensions. You can review Buy with Prime orders and traffic performance data, utilize the ecommerce purchase report, and build a customer exploration report that’s specific to Buy with Prime order data.
Ecommerce purchase report
To view data:
- On the Google Analytics home screen, choose the Reports (chart) icon.
- Navigate to the Monetization tab, and then Ecommerce Purchase Report.
- Change the first dimension to Item category to see Buy with Prime order data.
- Choose the plus (+) icon to add a secondary filter dimension. These are optional but can include: Traffic Source – Session Campaign, Traffic Source – Session Source, or Traffic Source – Session Source/Medium.
Buy with Prime exploration report
The exploration report provides your Buy with Prime data that includes orders, revenue, traffic (session source/medium and campaign) attribution, and new customer acquisition.
- On the Google Analytics home screen, choose the Exploration (globe) icon.
- Choose Start a new blank exploration.
- Name the report
- Add the following dimensions:
- Item category (Add Buy with Prime for the item category)
- Session source/medium
- Session campaign
- Add the following metrics:
- Sessions
- Engaged sessions
- Item quantity
- Item revenue
- First time purchasers
- Total purchasers
- Choose the Rows filter and then choose your dimensions.
- Choose your metrics. Note: The metrics are listed as Values.
- Once you choose your dimensions and metrics, the report populates your selected data points.
Meta and Google Ads conversion tracking FAQ
Get answers to common questions about Meta and Google Ads conversion tracking.
For other questions, go to FAQ library.


